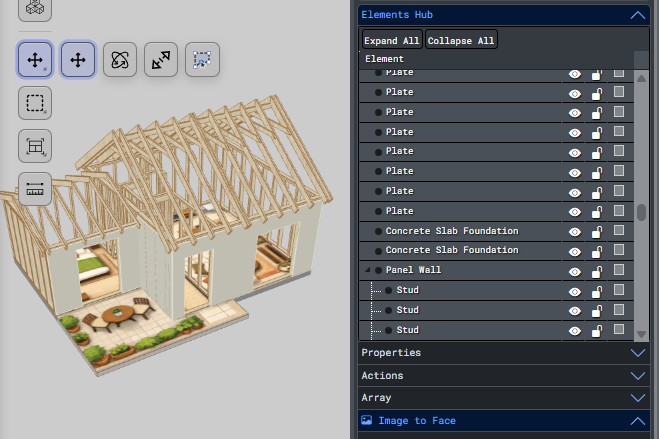
What Timbernetic is
Timbernetic is a web application for designing timber-frame buildings. You work in a Three.js 3D scene with a catalogue of smart components (walls, floors, beams, studs, plates, headers, doors, reinforcement plates, etc.) that know their own geometry and material codes. Anything you draft automatically feeds:
Scene model
A live 3D model you can rotate, pan, and edit at any level.
Object tree
A grid of everything in the scene, grouped hierarchically.
Bill of Materials
Cost, weight, and consolidated cut-list for every piece.
TechDraw
Paper-ready orthographic drawings with dimensions and annotations.
Work is saved per project and can be reopened later — geometry, groupings, parameter edits, and TechDraw sheets are all persisted.
The interface
When you open the builder you see three main areas:
| Area | What it holds |
|---|---|
| Left toolbar | Buttons for tools (Move, Rotate, Extrude, Vertex, Select, Group, Measure), the Components Library, and Projects. |
| Centre viewport | The 3D scene. Drag with middle mouse to orbit, right-mouse to pan, wheel to zoom. |
| Right pane | Accordion panels — Elements hub (object tree), Properties, Actions, Array, Output, Scene controls. |
Projects & autosave
- Click Projects Manager (Alt+P) in the toolbar.
- Create a new project or open an existing one. Each project keeps its own scene, BOM, and TechDraw sheets.
- Timbernetic saves automatically only temporary backups. You can save projects manually from the Projects Manager.
Live items / groups counter
The Projects Manager header shows a live counter:
5 / 100 items · 2 / 10 groups
It updates as you add, group or delete objects in the scene. The numbers turn red when you exceed your allowance for the current project — a save attempt at that point will be rejected, so the counter gives you advance warning.
Autosave history
Click Autosave history in the Projects Manager to browse previous autosave snapshots and restore any of them.
Adding elements
Open the Components Library (Alt+L) from the toolbar. The library is split by type (studs, plates, headers, panels, doors, slabs, etc.). Every entry is a smart component: it carries its own dimensions, material code and, where applicable, sub-members.
Placing components
- Pick a category (e.g. Panel Wall).
- Choose a preset; fill in any required fields (length, height, stud spacing, etc.).
- Confirm — the component is inserted into the scene and added to the Elements hub grid.
Smart components vs. simple shapes
A smart component (e.g. a panel wall) contains its own rebuild logic — editing its Width or Height regenerates its studs, plates and sheathing. A simple shape (plate, stud, slab) is a single mesh with dimensions and material.
Move, rotate, extrude, reshape
The Manipulate toolbar group holds the four core editing tools. They share a single gizmo anchor — once you select an object, the gizmo attaches to its bounding-box centre. Clicking any vertex handle relocates the rotation centre to that vertex for the next rotate operation.
| Tool | Shortcut | Use for |
|---|---|---|
| Move | Space | Drag along any gizmo arrow or plane. Hold Ctrl while dragging to duplicate instead of move. |
| Rotate | Alt+R | Rotate around the gizmo anchor (bbox centre by default; click a vertex handle first to pivot on that point). |
| Extrude | Alt+E | Resize a smart wall/floor by dragging one of its face handles. Members auto-regenerate. |
| Vertex (Reshape) | Alt+V | Edit the 2D footprint of a wall/floor: drag vertices, add/delete vertices, carve holes. Right-click a vertex for options. |
Selection & grouping
Selecting
- Click an object to select it.
- Shift-click to add to / remove from the selection.
- Box select (Alt+B): drag a rectangle over the scene to select everything it touches.
- Double-click a group to enter Edit Group mode — only that group's children are selectable until you exit (Esc).
Grouping
| Action | Shortcut | What it does |
|---|---|---|
| Group | Alt+G | Combine selected objects into a pivoted group. Moves/rotates now act on the whole group. |
| Ungroup | Alt+Shift+G | Dissolve the selected group (children become siblings again). |
| Edit group | Alt+H | Open the group for editing without dissolving. |
Array (duplicate) tool
The Array panel (right pane → Array accordion, Alt+A) creates linear or grid patterns of the current selection.
- Select the source object(s).
- Open the Array panel.
- Set the count along each axis and the step (gap) — either explicit mm or derived from the source's own dimensions.
- Press Apply. Copies are created in a single batched update (fast even for hundreds of copies).
Object properties
Open the Properties panel (right pane or Alt+O) to edit the current selection:
- Name — free-text label (appears in the Elements grid and BOM).
- Dimensions — Width / Length / Height. Editing these on a smart component rebuilds its members in place and preserves any rotation you'd already applied.
- Position / Rotation — numeric overrides for the gizmo.
- Material — change the material code; BOM and per-material fill colour update automatically.
- Lock / Hide — prevent edits, or hide from the viewport without deleting.
Undo / Redo
| Action | Shortcut |
|---|---|
| Undo | Ctrl+Z |
| Redo | Ctrl+Y or Ctrl+Shift+Z |
The history covers creation, deletion, move, rotate, extrude, reshape, group/ungroup, property edits, and array apply. Hover the toolbar Undo/Redo buttons to see the label of the operation that will be reversed or replayed.
Bill of Materials
Every object carries a material code and dimensions. Timbernetic compiles these into a cost matrix you can open from the Output accordion on the right pane.
Tabs
- Hierarchical — the tree of components and their members, with cost/weight per branch.
- Consolidated Materials — every stick-of-timber aggregated by (material, height, width, length), with Quantity, Ordered, and Arrived counters. Export as Excel with the toolbar button.
- Images — per-component preview images where available.
- Detail panel — click a row to see full properties, dimensions in mm / imperial, and totals.
TechDraw — technical drawings
TechDraw produces paper-ready 2D drawings (plans, elevations, isometrics, camera shots) of any part or the whole project.
Opening TechDraw
- Right-click an object → Add to TechDraw, then Show TechDraw.
- Or right-click empty space → Show TechDraw to open the panel with whatever objects you've added.
Workflow
- Objects button in the TechDraw header — tick the objects you want on the sheet.
- Choose Paper size, Scale and Views (Top / Front / Side / Isometric / Camera).
- Press Generate. Edges are projected and rendered with per-material colours, titles, and a BOM block.
- Add Measures (dimensions) and Angles from the sidebar tools. Arrows and labels scale with zoom.
- Save/Load button — save the current drawing under a name; open it again later. Saves are per-project.
- Print or export as SVG / PNG.
Keyboard shortcuts
| Shortcut | Action |
|---|---|
| Alt+P | Projects Manager |
| Alt+L | Components Library |
| Space | Move tool |
| Alt+R | Rotate tool |
| Alt+E | Extrude tool |
| Alt+V | Vertex / Reshape tool |
| Alt+B | Box Select |
| Alt+G | Group selection |
| Alt+Shift+G | Ungroup |
| Alt+H | Edit group |
| Alt+O | Object properties panel |
| Alt+A | Array panel |
| Alt+M | Measure tool |
| Del | Delete selection |
| Ctrl+Z | Undo |
| Ctrl+Y / Ctrl+Shift+Z | Redo |
| Ctrl + drag (move) | Duplicate while moving |
| Esc | Exit group edit / close current modal |
Tips & good practice
- Group early. Group a completed wall and its studs before duplicating — it keeps the BOM tidy and makes arrays much faster.
- Use Edit Group (Alt+H) to adjust a single member of a group without dissolving it.
- Anchor your rotations. Click a vertex handle before you rotate — the object will pivot around that exact point.
- Lock reference objects. Lock the foundation or baseplates while you work above them; you won't accidentally drag them.
- Watch the items / groups counter. If it turns red, group some loose pieces together or split work across multiple projects before saving.
- TechDraw saves are per project. Name your sheets meaningfully ("Ground floor plan", "Wall A — elevation") — the list grows fast.
- Consolidated Materials is the tab to hand to a supplier — it's the cut-list, not the hierarchical BOM.
- If you've made a series of changes you regret, open the Autosave history from the Projects Manager and restore an earlier snapshot.
Comments 0