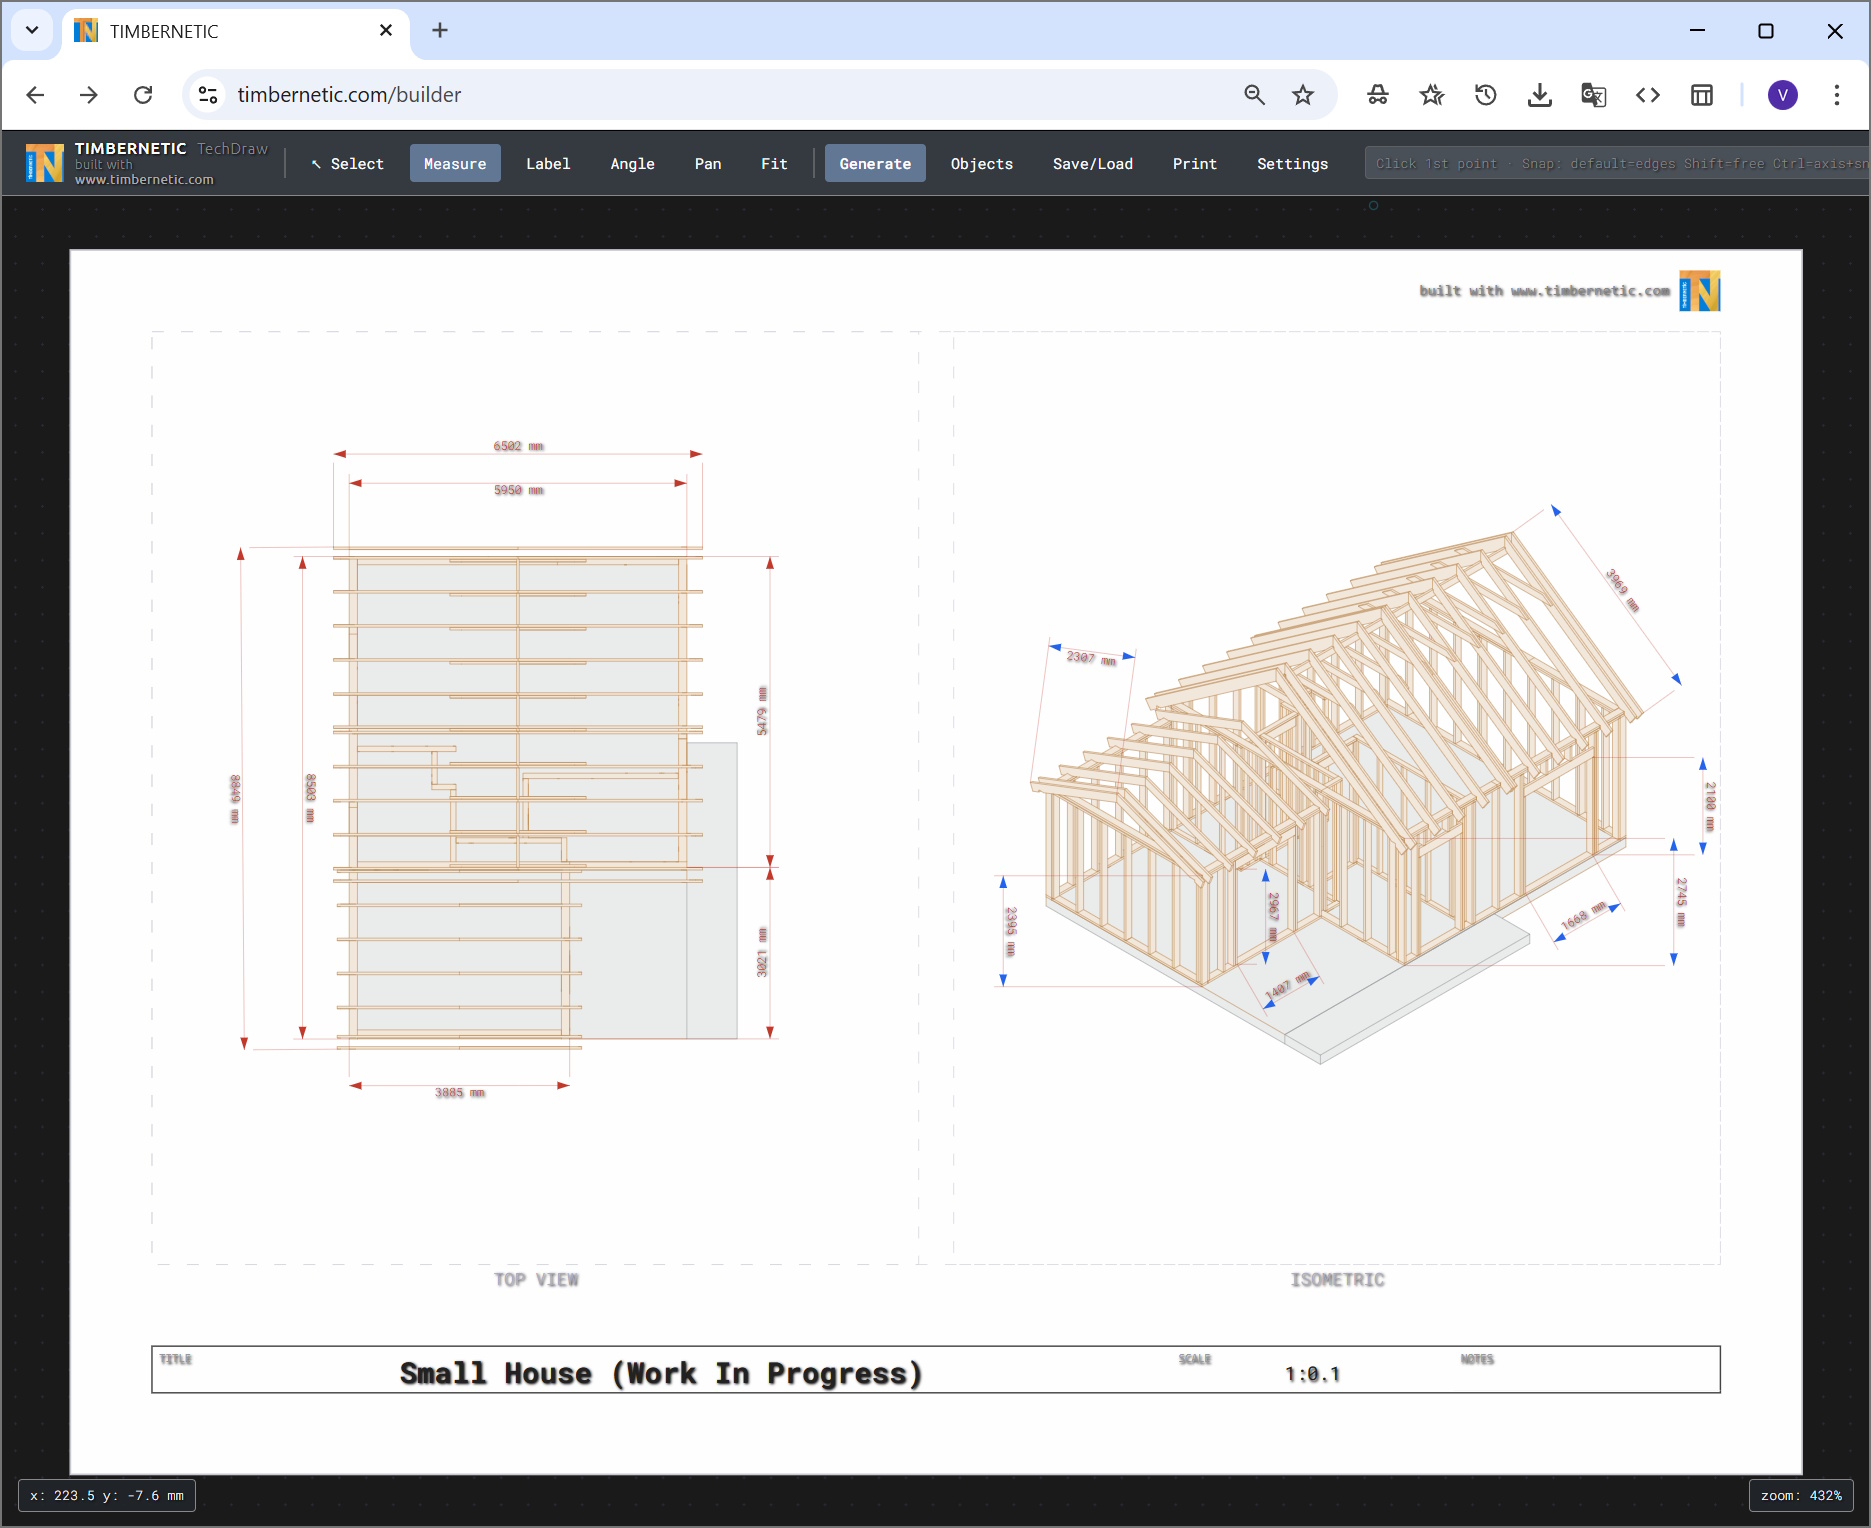
A complete walkthrough of the TechDraw window: producing paper-ready plans, elevations, isometrics and camera shots from your 3D model — with dimensions, angle annotations, a Bill of Materials block, and per-project saves.
What TechDraw is
TechDraw is the part of Timbernetic that turns the live 3D scene into paper-ready 2D drawings. Pick a paper size, pick a scale (not automatic), pick the views you want - TechDraw projects your model, draws clean edges, fills each surface with its material colour, and stamps a Bill of Materials block onto the sheet. You then add dimensions and angle callouts, save the result per project, and print (printer or PDF) or export to SVG / PNG.
Plans & elevations
Top, front, back, left, right and bottom orthographic views. World-up always points to paper-up.
Isometric & camera
3D isometric or a snapshot of your current orbit-camera angle.
Material colours
Each surface is filled with the colour of its material code; lower elements never paint over upper ones.
BOM block
Drag-positionable Bill of Materials embedded on the sheet, recomputed on every Generate.
Opening TechDraw
TechDraw works on a list of objects you've explicitly added to it (rather than the whole scene). To open it:
- Right-click an object in the 3D viewport → Add to TechDraw. The object joins the TechDraw set. Repeat for every object you want on the sheet — additions are deduplicated automatically.
- Right-click again (anywhere) → Show TechDraw to open the panel.
The TechDraw window
The window has three regions:
| Region | Contents |
|---|---|
| Header | Generate, Objects, Save/Load, Print, Settings, Close. Most of your interaction starts here. |
| Sidebar | Tool buttons (Measure, Angle), the annotation list, view-mode toggles, paper size and scale selectors. |
| Canvas | The paper area with a viewport showing your projected drawing. Wheel to zoom; click-drag empty space to pan. |
Two of the busier controls — the object selector and the saved-drawings list — open as sub-modals on top of the canvas, keeping the sidebar tidy.
Choosing what's on the sheet
Click Objects in the header to open the Objects sub-modal. It lists every object you've added to TechDraw with a checkbox.
- Tick / untick rows to include or exclude each object from the next Generate.
- Select All / Select None at the top of the list.
- Close with the × button, by clicking the backdrop, or by pressing
Esc.
Paper, scale & views
Paper sizes
Standard ISO sizes (A0–A4) in either portrait or landscape. The drawing area, title block and BOM block all rescale to fit. Switching paper size after a Generate is fine — re-run Generate and the layout reflows.
Scales
Pick a preset (1:10, 1:20, 1:50, 1:100, etc.) or enter a custom value. The scale label appears in the title block.
View types
| View | What it shows |
|---|---|
| Top | Looking straight down. The classic floor plan. |
| Bottom | Looking straight up — the underside. |
| Front / Back | Front or back elevation. |
| Left / Right | Side elevations. 2026-04 fix world-up always maps to paper-up. |
| Isometric | Standard 3D isometric. Useful for assembly and presentation drawings. |
| Camera | The current angle of your 3D orbit camera (orthographic). Set up the view in the main scene first, then open TechDraw and Generate. |
Generate
Hit the Generate button (top-left of the header) any time you change paper size, scale, view selection, or the set of ticked objects. Generate:
- Projects every selected object's edges into 2D.
- Removes hidden edges using occlusion testing.
- Fills each visible polygon with the colour of its source material.
- Sorts so background objects render first and foreground objects on top — an upper element will never inherit a lower element's colour at a shared edge.
- Lays out the title block and the BOM.
Edges and fills appear as a single live SVG drawing. You can keep working in the main scene afterwards — re-Generate to refresh the drawing.
Measures (dimensions)
- Click the Measure tool in the sidebar.
- Click your first snap point. The cursor snaps to vertices, edge midpoints and intersections within a small radius.
- Click your second snap point. A live preview line follows the cursor.
- Click again to place the dimension line at the desired offset. The measurement, in millimetres, is stamped between the arrows.
Behaviour
- Arrows are explicit filled triangles drawn at a fixed paper size (2.1 mm). They look identical in the preview and on the printed sheet.
- Click an existing measurement on the drawing to highlight its row in the sidebar annotation list (the row also scrolls into view).
- Per-annotation overrides: font size, colour, and offset can be tweaked individually from the annotation list.
- Delete a measure from the annotation-list row, or via right-click on the canvas.
Angles
- Click the Angle tool in the sidebar.
- Click the vertex (the corner where the angle is measured).
- Click a point along the first arm.
- Click a point along the second arm. The angle in degrees is stamped near the vertex.
Clean rays
If an arm of the angle would lie along an edge already drawn (e.g. a wall edge from your projection), TechDraw clips the ray against that edge instead of drawing on top of it. The result is a single visible line — no double thickness, no smudged corners. The portion of the ray past the edge (if any) is still drawn so the geometry of the angle stays clear.
Like measures, angles render an [ang] tag in the annotation list, and clicking the angle on the canvas highlights its row.
The BOM block (not yet implemented)
The Bill of Materials block is laid down on the sheet at Generate time. It lists each piece of timber on the drawing — material, dimensions, and quantity — using the same data as the right-pane Output → Consolidated Materials tab.
- Reposition: click and drag the BOM block anywhere on the paper.
- Recompute: hit Generate again whenever the scene changes — adding or removing pieces shows up in the BOM immediately.
- Title block at the bottom of the sheet shows project, scale, paper size, and revision date alongside the BOM.
Save / Load per-project
Click Save/Load in the header to open the saved-drawings sub-modal. From here you can name and save the current drawing, reload an earlier save, or delete saves you no longer need.
Per-project scoping
Saved drawings are scoped to the current project. Two different projects can each have a sheet called "Floor Plan" without colliding — the list you see in Save/Load only contains saves belonging to the project you're currently working in.
- Where they live: on your computer, in the browser's local storage. Saves persist across sessions on the same browser, but they don't follow you to a different machine or browser.
- Deleting a project automatically removes that project's TechDraw saves — they don't outlive their parent.
Why Generate runs again after a Load
To keep saves small and avoid hitting the browser's storage limit, the projection data (the edges and fills you see on screen) is not stored. Only the sheet setup — chosen objects, paper size, scale, views, BOM block position, and your annotations — is saved. After Load, click Generate once and TechDraw rebuilds the projection from the live scene. This also means a saved drawing automatically reflects any model changes you made between the original save and the next Load.
Export & Print
| Action | How | Result |
|---|---|---|
| Print button in the header | Opens your browser's print dialog with the sheet at the chosen paper size. | |
| SVG export | Export menu → SVG | Vector file — sharp at any scale, editable in Illustrator / Inkscape. |
| PNG export | Export menu → PNG | Raster file rendered at the screen DPI of the canvas. |
Tips & good practice
- Group your objects in the scene first. Adding one group to TechDraw is faster than picking ten members one by one — and the BOM groups them sensibly.
- Anchor rotations before you Generate. If a wall sits at an odd angle, the side views still show it correctly (world-up = paper-up), but front/back projections will read more clearly if the wall is rotated to a clean 0/90/180/270.
- Name your sheets descriptively. "Ground floor — plan @1:50", "Wall A — north elevation", "Iso 4-up". The Save/Load list grows fast on a real project.
- Save often. Because Load re-Generates from the live scene, your save snapshots only need to capture setup, not graphics — saves are cheap.
- Use Camera view for client previews. Set up a flattering orbit angle in the scene, switch to TechDraw, tick Camera, Generate — instant 3D presentation drawing with materials.
- One sheet, one purpose. A separate save for plan, elevations, isometric and details is easier to manage (and re-print) than one giant sheet with everything on it.
- Re-Generate after material changes. Switching the material on a stud in the scene only updates the drawing's fill colour after the next Generate.
- Click annotations to find them in the list. When dimensions and angles pile up, clicking the one you want on the canvas scrolls its row into view — easier than scrolling the sidebar.
Keyboard & mouse
| Input | Action |
|---|---|
| Mouse wheel | Zoom the canvas. |
| Click-drag empty space | Pan the canvas. |
| Click an annotation | Select it and highlight its row in the sidebar list. |
| Double-click an annotation row | Edit its label / properties (font size, colour). |
| Drag the BOM block | Reposition the BOM on the paper. |
Esc | Close the open sub-modal (Objects or Save/Load), or close TechDraw if no sub-modal is open. |
Comments 0